GluonCV: Image Segmentation using Pre-Trained MXNet Models
Image Segmentation
Image segmentation is segmenting an image into segments (also referred to as objects). We detect objects present in images and color them to separate them from each other. It mainly concentrates on detecting boundaries of objects hence they can be easily separated.
Image segmentation has various applications like video surveillance, detecting objects in self-driving cars, content-based image retrieval, face detection, etc.
Types of Image Segmentation
- Instance Segmentation - All objects of same type are marked with different colors/labels. Each object has its own color/label. E.g., Individual persons in image will have different colors/labels.
- Semantic Segmentation - All objects of same type are marked with one color/label. E.g., all people in images will have same color/label.

Deep Learning Algorithms for Image Segmentation
Over the years many different approaches have been developed for image segmentation tasks. Some of them use machine learning (deep learning) whereas others use non-ML solutions.
Below, we have listed some of the famous neural networks that solve image segmentation tasks.
- U-Net
- Fast-FCN (Fully Convolutional Network)
- Mask R-CNN
- DeepLab
- Gates-SCNN
What Can You Learn From This Tutorial?
As a part of this tutorial, we have explained how to use pre-trained mxnet models available from gluoncv for image segmentation tasks. GluonCV is a computer vision toolkit of MXNet and provides pre-trained models for many computer vision tasks like image classification, object detection, segmentation, pose estimation, action recognition, etc. We have downloaded few images from the internet and tried pre-trained models on them. We have explained usage of both instance and semantic segmentation models. GluonCV provides models that are trained on datasets COCO, Pascal VOC, Cityscapes, ADE20K and MHP-V1. It provides an implementation of majority of deep learning models we have listed above.
Below, we have listed important sections of tutorial to give an overview of the material covered.
Important Sections Of Tutorial
- Load Images
- 1.1 Download Images from Internet
- 1.2 Transform Images to MXNet ND Arrays
- Load Pre-Trained Models
- 2.1 Load Instance Segmentation
- 2.2 Load Semantic Segmentation
- Make Predictions
- 3.1 Instance Segmentation Model Prediction
- 3.2 Semantic Segmentation Model Prediction
- Visualize Results
- 4.1 Instance Segmentation
- 4.2 Semantic Segmentation
- Try Other Models
Below, we have imported necessary Python libraries that we have used in our tutorial and printed the versions of them.
MXNet & GluonCV Installation
- !pip install --upgrade mxnet gluoncv
import mxnet

print("MXNet Version : {}".format(mxnet.__version__))
import gluoncv

print("GluonCV Version : {}".format(gluoncv.__version__))
device = mxnet.gpu() if mxnet.test_utils.list_gpus() else mxnet.cpu()

device
1. Load Images 
In this section, we are simply loading images from internet and converting them to MXNet NdArrays. We'll be applying image segmentation models to these images.
1.1 Download Images from Internet
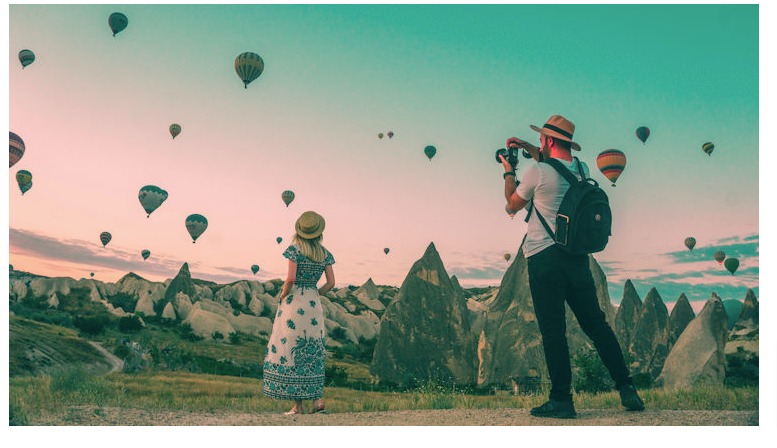
Below, we are downloading 5 images from internet. The images have different kinds of objects like persons, toys, animals, etc.
We have downloaded images using download utility available from gluoncv. It'll download an image, store it in current directory, rename it as per second argument and return image name.
from gluoncv import utils

vacation = utils.download("https://www.luxurytravelmagazine.com/files/593/2/80152/luxury-travel-instagram_bu.jpg", "vacation.jpg")
dog_kid_playing = utils.download("https://www.akc.org/wp-content/uploads/2020/12/training-behavior.jpg", "dog_kid_playing.jpg")
kids_playing = utils.download("https://images.squarespace-cdn.com/content/v1/519bd105e4b0c8ea540e7b36/1555002210238-V3YQS9DEYD2QLV6UODKL/The-Benefits-Of-Playing-Outside-For-Children.jpg", "kids_playing.jpg")
sea_lion = utils.download("https://149366112.v2.pressablecdn.com/wp-content/uploads/2016/11/1280px-monachus_schauinslandi.jpg", "sea_lion.jpg")
panda = utils.download("https://upload.wikimedia.org/wikipedia/commons/thumb/3/3c/Giant_Panda_2004-03-2.jpg/1200px-Giant_Panda_2004-03-2.jpg", "panda.jpg")
from PIL import Image

Image.open(vacation)
1.2 Transform Images to MXNet ND Arrays
In this section, we have loaded images and converted them to MXNet NdArray.
Gluoncv provides us with method named test_transform() that can be used to convert image to Mxnet NdArray. It prepares images for segmentation tasks.
from gluoncv.data.transforms.presets.segmentation import test_transform
from mxnet.image import imread

vacation_arr = test_transform(imread(vacation), ctx=mxnet.Context(mxnet.cpu()))
dog_kid_playing_arr = test_transform(imread(dog_kid_playing), ctx=mxnet.Context(mxnet.cpu()))
kids_playing_arr = test_transform(imread(kids_playing), ctx=mxnet.Context(mxnet.cpu()))
sea_lion_arr = test_transform(imread(sea_lion), ctx=mxnet.Context(mxnet.cpu()))
panda_arr = test_transform(imread(panda), ctx=mxnet.Context(mxnet.cpu()))


vacation_arr.shape, dog_kid_playing_arr.shape, kids_playing_arr.shape, sea_lion_arr.shape, panda_arr.shape,
2. Load Models 
In this section, we are simply loading pre-trained MXNet models. We have loaded one model to explain instance segmentation and one model for semantic segmentation.
We'll be using both models to make predictions on our images.
2.1 Load Instance Segmentation
Here, we have loaded Masked R-CNN model with ResNet101 backbone. The model is trained on COCO dataset.
We have loaded model using get_model() method of model_zoo sub-module of gluoncv module.
We need to set pretrained parameter to True in order to load model with pre-trained weights else it'll only load model architecture.
from gluoncv.model_zoo import get_model

rcnn_resnet_coco_inst_seg = get_model("mask_rcnn_resnet101_v1d_coco", pretrained=True)
2.2 Load Semantic Segmentation
Here, we have loaded FCN model with ResNet101 backbone. It'll be used for semantic segmentation tasks.
from gluoncv.model_zoo import get_model

fcn_resnet_coco_sem_seg = get_model("fcn_resnet101_coco", pretrained=True)
3. Make Predictions 
Now, we'll make predictions on images using the models we loaded in previous section.
3.1 Instance Segmentation Model Prediction
In this section, we have made predictions on our 5 images using Masked R-CNN instance segmentation model.
The model returns 4 MXNet NDArrays as a prediction.
- Labels - Labels of segments/objects detected in an image
- Scores - Probability of detected segments/objects
- Bounding Boxes - Bounding boxes around detected objects
- Masks - Object Masks for detected objects that can be used to highlight objects in an image
3.1.1 Vacation Image
vacation_ids, vacation_scores, vacation_bboxes, vacation_masks = rcnn_resnet_coco_inst_seg(vacation_arr)

vacation_ids.shape, vacation_scores.shape, vacation_bboxes.shape, vacation_masks.shape
3.1.2 Kids Playing Image
kids_playing_ids, kids_playing_scores, kids_playing_bboxes, kids_playing_masks = rcnn_resnet_coco_inst_seg(kids_playing_arr)

kids_playing_ids.shape, kids_playing_scores.shape, kids_playing_bboxes.shape, kids_playing_masks.shape
3.1.3 Dog & Kid Playing Image
dog_kid_playing_ids, dog_kid_playing_scores, dog_kid_playing_bboxes, dog_kid_playing_masks = rcnn_resnet_coco_inst_seg(dog_kid_playing_arr)

dog_kid_playing_ids.shape, dog_kid_playing_scores.shape, dog_kid_playing_bboxes.shape, dog_kid_playing_masks.shape
3.1.4 Panda Image
panda_ids, panda_scores, panda_bboxes, panda_masks = rcnn_resnet_coco_inst_seg(panda_arr)

panda_ids.shape, panda_scores.shape, panda_bboxes.shape, panda_masks.shape
3.1.5 Sea Lion Image
sea_lion_ids, sea_lion_scores, sea_lion_bboxes, sea_lion_masks = rcnn_resnet_coco_inst_seg(sea_lion_arr)

sea_lion_ids.shape, sea_lion_scores.shape, sea_lion_bboxes.shape, sea_lion_masks.shape
3.2 Semantic Segmentation Model Prediction
In this section, we are making predictions on our 5 images using FCN semantic segmentation model that we loaded earlier.
The prediction of semantic segmentation model is object masks.
3.2.1 Vacation Image
vacation_sem_seg_pred = fcn_resnet_coco_sem_seg(vacation_arr)

len(vacation_sem_seg_pred), vacation_sem_seg_pred[0].shape, vacation_sem_seg_pred[1].shape
3.2.2 Kids Playing Image
kids_playing_sem_seg_pred = fcn_resnet_coco_sem_seg(kids_playing_arr)

len(kids_playing_sem_seg_pred), kids_playing_sem_seg_pred[0].shape, kids_playing_sem_seg_pred[1].shape
3.2.3 Dog & Kid Playing Image
dog_kid_playing_sem_seg_pred = fcn_resnet_coco_sem_seg(dog_kid_playing_arr)

len(dog_kid_playing_sem_seg_pred), dog_kid_playing_sem_seg_pred[0].shape, dog_kid_playing_sem_seg_pred[1].shape
3.2.4 Panda Image
panda_sem_seg_pred = fcn_resnet_coco_sem_seg(panda_arr)

len(panda_sem_seg_pred), panda_sem_seg_pred[0].shape, panda_sem_seg_pred[1].shape
3.2.5 Sea Lion Image
sea_lion_sem_seg_pred = fcn_resnet_coco_sem_seg(sea_lion_arr)

len(sea_lion_sem_seg_pred), sea_lion_sem_seg_pred[0].shape, sea_lion_sem_seg_pred[1].shape
4. Visualize Results 
In this section, we'll visualize predictions made by our image segmentation models. We'll overlay detected object/segment masks over original image.
4.1 Instance Segmentation
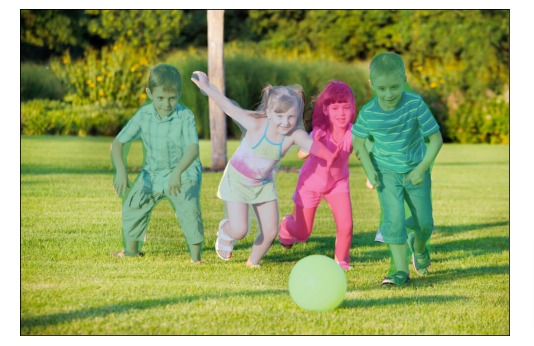
In this section, we have visualized predictions made by instance segmentation models.
We have first modified mask size according to image size using expand_mask() method of GluonCV visualization utility. The segmentation transforms that we applied to images when loading images could have modified image size hence predictions made on modified images need to be resized according to original image.
Then, we have overlaid masks over an original image using plot_mask() method.
At last, we have visualized original image with masks overlaid.
from gluoncv.utils.viz import plot_mask, expand_mask

_, _, height, width = vacation_arr.shape

vacation_masks_mod, _ = expand_mask(vacation_masks[0], vacation_bboxes[0], (width, height), vacation_scores[0])

vacation_pred = plot_mask(imread(vacation).reshape(height, width, 3), vacation_masks_mod.squeeze())

vacation_pred.shape
import matplotlib.pyplot as plt

fig = plt.figure(figsize=(10,6))
ax = fig.add_subplot(1,1,1)
ax.imshow(vacation_pred);
ax.set_xticks([],[]); ax.set_yticks([],[]);

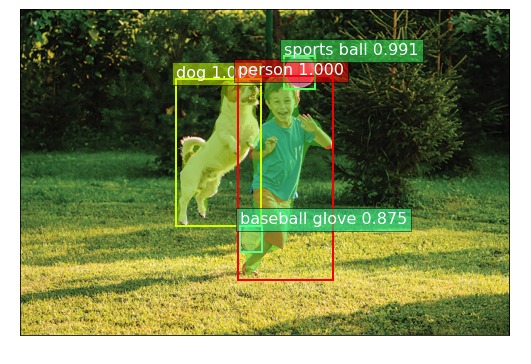
Below, we have used plot_bbox() visualization utility available from GluonCV to visualize masks over image along with bounding boxes and labels.
import matplotlib.pyplot as plt
from gluoncv.utils.viz import plot_bbox

fig = plt.figure(figsize=(10,6))
ax = fig.add_subplot(111)
plt.xticks([]);plt.yticks([]);

plot_bbox(vacation_pred,
              bboxes=vacation_bboxes[0],
              scores=vacation_scores[0],
              labels=vacation_ids[0],
              class_names=rcnn_resnet_coco_inst_seg.classes,
              thresh=0.8, fontsize=16, linewidth=2.0,
              ax=ax
             );

Below, we have visualized predictions made on kids playing image using same process we used earlier.
from gluoncv.utils.viz import plot_mask, expand_mask

_, _, height, width = kids_playing_arr.shape

kids_playing_masks_mod, _ = expand_mask(kids_playing_masks[0], kids_playing_bboxes[0], (width, height), kids_playing_scores[0])

kids_playing_pred = plot_mask(imread(kids_playing).reshape(height, width, 3), kids_playing_masks_mod.squeeze())

kids_playing_pred.shape
import matplotlib.pyplot as plt

fig = plt.figure(figsize=(10,6))
ax = fig.add_subplot(1,1,1)
ax.imshow(kids_playing_pred);
ax.set_xticks([],[]); ax.set_yticks([],[]);
import matplotlib.pyplot as plt
from gluoncv.utils.viz import plot_bbox

fig = plt.figure(figsize=(10,6))
ax = fig.add_subplot(111)
plt.xticks([]);plt.yticks([]);

plot_bbox(kids_playing_pred,
              bboxes=kids_playing_bboxes[0],
              scores=kids_playing_scores[0],
              labels=kids_playing_ids[0],
              class_names=rcnn_resnet_coco_inst_seg.classes,
              thresh=0.8, fontsize=16, linewidth=2.0,
              ax=ax
             );

Below, we have visualized predictions made on sea lion image using same process we used earlier.
from gluoncv.utils.viz import plot_mask, expand_mask

_, _, height, width = sea_lion_arr.shape

sea_lion_masks_mod, _ = expand_mask(sea_lion_masks[0], sea_lion_bboxes[0], (width, height), sea_lion_scores[0])

sea_lion_pred = plot_mask(imread(sea_lion).reshape(height, width, 3), sea_lion_masks_mod.squeeze())

sea_lion_pred.shape
import matplotlib.pyplot as plt
from gluoncv.utils.viz import plot_bbox

fig = plt.figure(figsize=(10,6))
ax = fig.add_subplot(111)
plt.xticks([]);plt.yticks([]);

plot_bbox(sea_lion_pred,
              bboxes=sea_lion_bboxes[0],
              scores=sea_lion_scores[0],
              labels=sea_lion_ids[0],
              class_names=rcnn_resnet_coco_inst_seg.classes,
              thresh=0.8, fontsize=16, linewidth=2.0,
              ax=ax
             );

Below, we have visualized predictions made on pandas image using same process we used earlier.
from gluoncv.utils.viz import plot_mask, expand_mask

_, _, height, width = panda_arr.shape

panda_masks_mod, _ = expand_mask(panda_masks[0], panda_bboxes[0], (width, height), panda_scores[0])

### Please make a NOTE that below is just repeat of same mask.
### We noticed that plot_mask() method is failing when there is only one object detected hence we repeated same object to avoid error.
panda_masks_mod = mxnet.nd.stack(mxnet.nd.array(panda_masks_mod), mxnet.nd.array(panda_masks_mod), axis=1)

panda_pred = plot_mask(imread(panda).reshape(height, width, 3), panda_masks_mod.squeeze())

panda_pred.shape
import matplotlib.pyplot as plt
from gluoncv.utils.viz import plot_bbox

fig = plt.figure(figsize=(10,6))
ax = fig.add_subplot(111)
plt.xticks([]);plt.yticks([]);

plot_bbox(panda_pred,
              bboxes=panda_bboxes[0],
              scores=panda_scores[0],
              labels=panda_ids[0],
              class_names=rcnn_resnet_coco_inst_seg.classes,
              thresh=0.8, fontsize=16, linewidth=2.0,
              ax=ax
             );

Below, we have visualized predictions made on dog and kid playing image using same process we used earlier.
from gluoncv.utils.viz import plot_mask, expand_mask

_, _, height, width = dog_kid_playing_arr.shape

dog_kid_playing_masks_mod, _ = expand_mask(dog_kid_playing_masks[0], dog_kid_playing_bboxes[0], (width, height), dog_kid_playing_scores[0])

dog_kid_playing_pred = plot_mask(imread(dog_kid_playing).reshape(height, width, 3), dog_kid_playing_masks_mod.squeeze())

dog_kid_playing_pred.shape
import matplotlib.pyplot as plt
from gluoncv.utils.viz import plot_bbox

fig = plt.figure(figsize=(10,6))
ax = fig.add_subplot(111)
plt.xticks([]);plt.yticks([]);

plot_bbox(dog_kid_playing_pred,
              bboxes=dog_kid_playing_bboxes[0],
              scores=dog_kid_playing_scores[0],
              labels=dog_kid_playing_ids[0],
              class_names=rcnn_resnet_coco_inst_seg.classes,
              thresh=0.8, fontsize=16, linewidth=2.0,
              ax=ax
             );
4.2 Semantic Segmentation
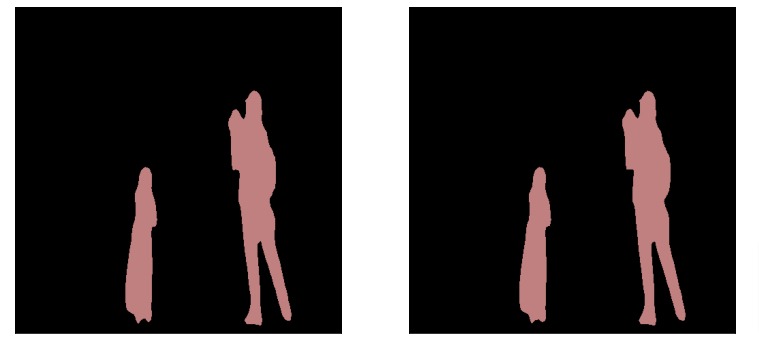
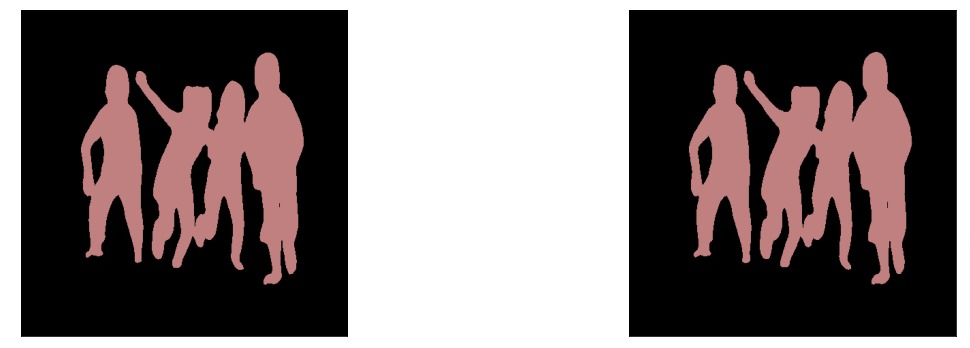
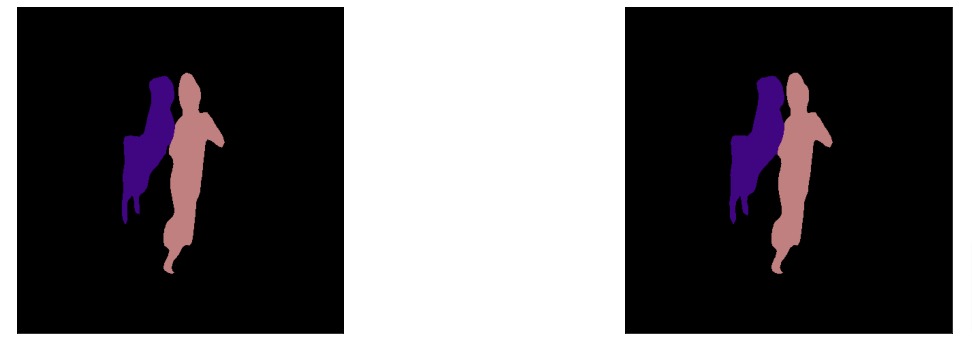
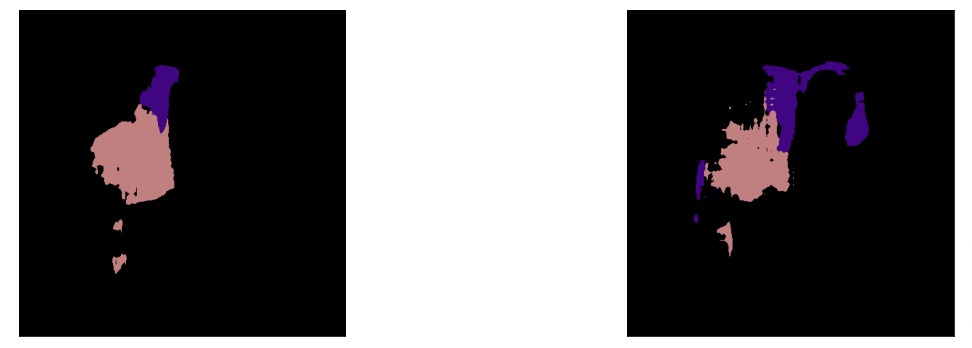
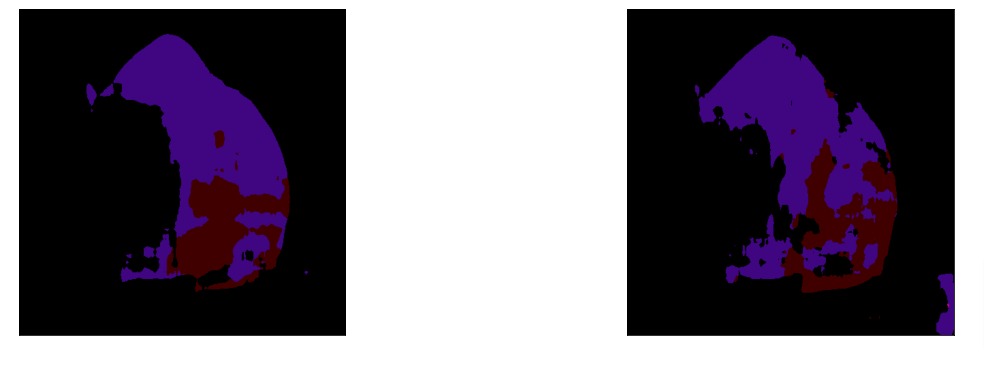
In this section, we have visualized predictions made on images using semantic segmentation model.
In order to prepare image for visualization, we have used get_color_pallete() method of GluonCV visualization utilities. It'll return an image with masks of same objects highlighted with same color.
Below, we have visualized predictions made on all our images one by one.
from gluoncv.utils.viz import get_color_pallete

vacation_sem_seg_pred = [pred.argmax(axis=1).squeeze().asnumpy() for pred in vacation_sem_seg_pred]

fig = plt.figure(figsize=(20,6))

ax1 = fig.add_subplot(1,3,1)
ax1.imshow(get_color_pallete(vacation_sem_seg_pred[0], "coco"));
ax1.set_xticks([]); ax1.set_yticks([]);

ax2 = fig.add_subplot(1,3,2)
ax2.imshow(get_color_pallete(vacation_sem_seg_pred[1], "coco"));
ax2.set_xticks([]); ax2.set_yticks([]);
from gluoncv.utils.viz import get_color_pallete

kids_playing_sem_seg_pred = [pred.argmax(axis=1).squeeze().asnumpy() for pred in kids_playing_sem_seg_pred]

fig = plt.figure(figsize=(20,6))

ax1 = fig.add_subplot(1,2,1)
ax1.imshow(get_color_pallete(kids_playing_sem_seg_pred[0], "coco"));
ax1.set_xticks([]); ax1.set_yticks([]);

ax2 = fig.add_subplot(1,2,2)
ax2.imshow(get_color_pallete(kids_playing_sem_seg_pred[1], "coco"));
ax2.set_xticks([]); ax2.set_yticks([]);
from gluoncv.utils.viz import get_color_pallete

dog_kid_playing_sem_seg_pred = [pred.argmax(axis=1).squeeze().asnumpy() for pred in dog_kid_playing_sem_seg_pred]

fig = plt.figure(figsize=(20,6))

ax1 = fig.add_subplot(1,2,1)
ax1.imshow(get_color_pallete(dog_kid_playing_sem_seg_pred[0], "coco"));
ax1.set_xticks([]); ax1.set_yticks([]);

ax2 = fig.add_subplot(1,2,2)
ax2.imshow(get_color_pallete(dog_kid_playing_sem_seg_pred[1], "coco"));
ax2.set_xticks([]); ax2.set_yticks([]);
from gluoncv.utils.viz import get_color_pallete

sea_lion_sem_seg_pred = [pred.argmax(axis=1).squeeze().asnumpy() for pred in sea_lion_sem_seg_pred]

fig = plt.figure(figsize=(20,6))

ax1 = fig.add_subplot(1,2,1)
ax1.imshow(get_color_pallete(sea_lion_sem_seg_pred[0], "coco"));
ax1.set_xticks([]); ax1.set_yticks([]);

ax2 = fig.add_subplot(1,2,2)
ax2.imshow(get_color_pallete(sea_lion_sem_seg_pred[1], "coco"));
ax2.set_xticks([]); ax2.set_yticks([]);
from gluoncv.utils.viz import get_color_pallete

panda_sem_seg_pred = [pred.argmax(axis=1).squeeze().asnumpy() for pred in panda_sem_seg_pred]

fig = plt.figure(figsize=(20,6))

ax1 = fig.add_subplot(1,2,1)
ax1.imshow(get_color_pallete(panda_sem_seg_pred[0], "coco"));
ax1.set_xticks([]); ax1.set_yticks([]);

ax2 = fig.add_subplot(1,2,2)
ax2.imshow(get_color_pallete(panda_sem_seg_pred[1], "coco"));
ax2.set_xticks([]); ax2.set_yticks([]);
5. Try Other Models 
GluonCV library provides many other pre-trained models for image segmentation tasks. We have listed below them. We would suggest that you try them as well if you are not getting good results using above models.
1. Semantic Segmentation Models
Models Trained on ADE20K Dataset
- fcn_resnet50_ade
- fcn_resnet101_ade
- psp_resnet50_ade
- psp_resnet101_ade
- deeplab_resnet50_ade
- deeplab_resnet101_ade
- deeplab_resnest50_ade
- deeplab_resnest101_ade
- deeplab_resnest200_ade
- deeplab_resnest269_ade
Models Trained on COCO Dataset
- fcn_resnet101_coco
- psp_resnet101_coco
- deeplab_resnet101_coco
Models Trained on Pascal VOC Dataset
- fcn_resnet101_voc
- psp_resnet101_voc
- deeplab_resnet101_voc
- deeplab_resnet152_voc
Models Trained on Cityscapes Dataset
- psp_resnet101_citys
- deeplab_resnet50_citys
- deeplab_resnet101_citys
- danet_resnet50_citys
- danet_resnet101_citys
- icnet_resnet50_citys
- fastscnn_citys
- deeplab_v3b_plus_wideresnet_citys
2. Instance Segmentation Models
Models Trained on COCO Dataset
- mask_rcnn_resnet18_v1b_coco
- mask_rcnn_fpn_resnet18_v1b_coco
- mask_rcnn_resnet50_v1b_coco
- mask_rcnn_fpn_resnet50_v1b_coco
- mask_rcnn_resnet101_v1d_coco
- mask_rcnn_fpn_resnet101_v1d_coco
References
 Sunny Solanki
![YouTube Subscribe]() Comfortable Learning through Video Tutorials?
Comfortable Learning through Video Tutorials?
If you are more comfortable learning through video tutorials then we would recommend that you subscribe to our YouTube channel.
![Need Help]() Stuck Somewhere? Need Help with Coding? Have Doubts About the Topic/Code?
Stuck Somewhere? Need Help with Coding? Have Doubts About the Topic/Code?
When going through coding examples, it's quite common to have doubts and errors.
If you have doubts about some code examples or are stuck somewhere when trying our code, send us an email at coderzcolumn07@gmail.com. We'll help you or point you in the direction where you can find a solution to your problem.
You can even send us a mail if you are trying something new and need guidance regarding coding. We'll try to respond as soon as possible.
![Share Views]() Want to Share Your Views? Have Any Suggestions?
Want to Share Your Views? Have Any Suggestions?
If you want to
- provide some suggestions on topic
- share your views
- include some details in tutorial
- suggest some new topics on which we should create tutorials/blogs


 Comfortable Learning through Video Tutorials?
 Stuck Somewhere? Need Help with Coding? Have Doubts About the Topic/Code?
 Want to Share Your Views? Have Any Suggestions?
 GluonCV, Image-Segmentation, Pre-trained-Models